
当前所在的团队规模较小,并且之前一直都没有使用Maven私有仓库的需求。最近需要将公司的项目进行微服务改造,要提取一些api-jar包,所以需要搭建Maven私有仓库。选用的软件是sonatype公司的Nexus Repository OSS,服务器系统为Windows,在此将搭建过程记录下来。
Nexus Repository OSS下载与安装
下载
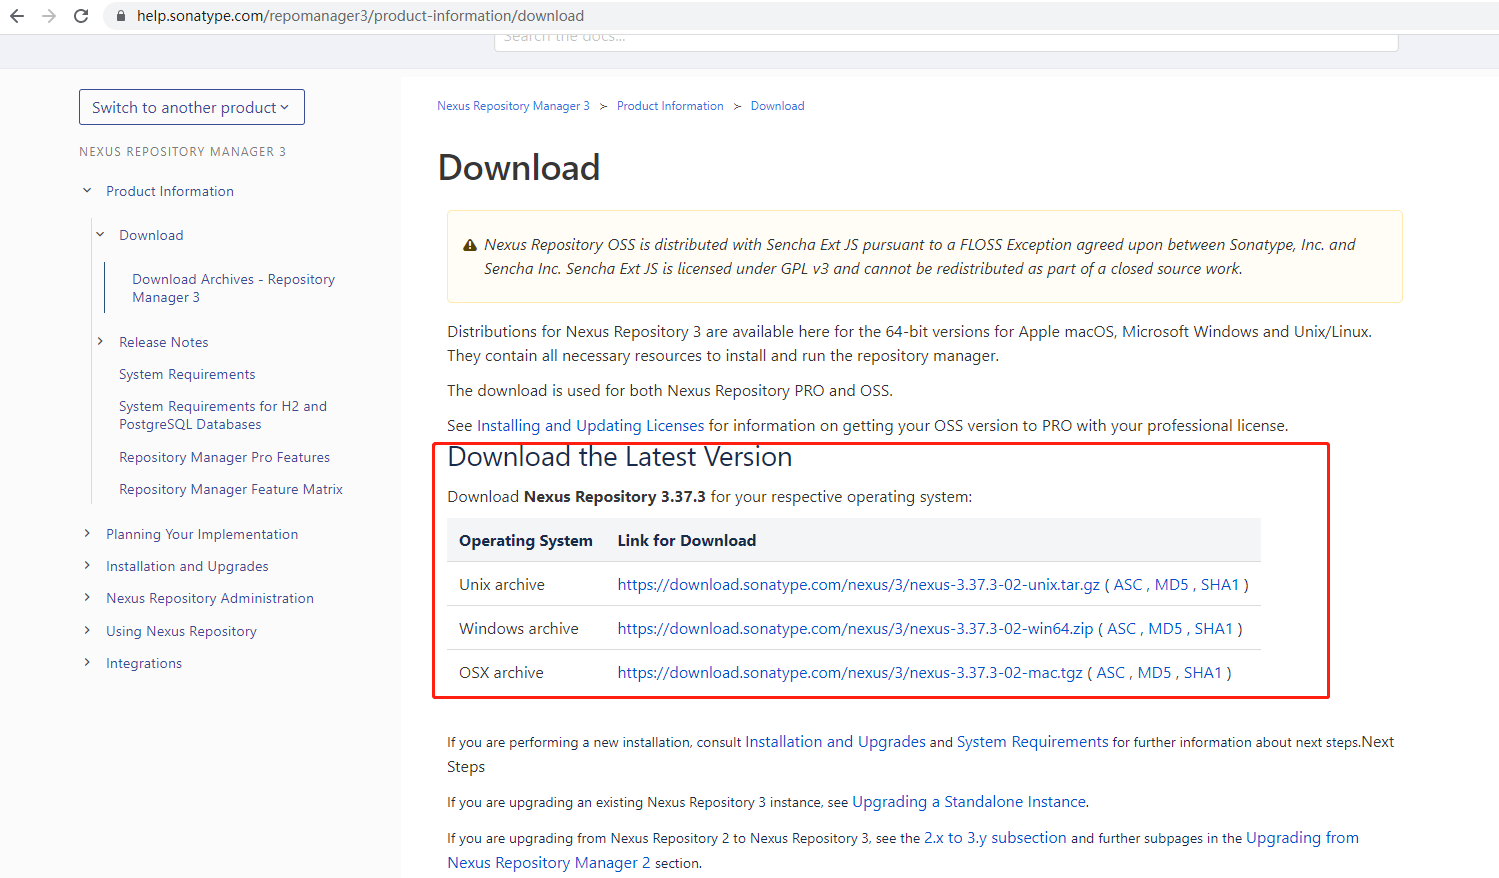
访问下载地址 https://help.sonatype.com/repomanager3/product-information/download ,选择自己需要的版本下载即可。
安装
1、创建目录C:\nexus,只要不要安装在C:\Program Files目录中即可,避免Windows文件注册表虚拟化出现问题。
2、将下载好的压缩包解压至C:\nexus目录中,结构如下:
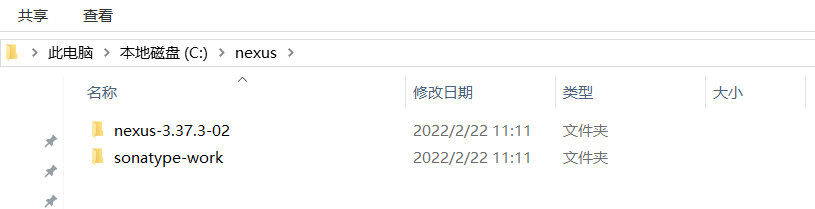
其中nexus-3.37.3-02为安装目录,此目录包含Nexus Repository Manager应用程序和所有必需的附加组件,如Java库和配置文件。默认情况下,目录名使用nexus-开头并附加版本号。sonatype-work为数据目录所在目录,该目录包含由repository manager存储和管理的所有repositories、components 和其他数据。数据目录的默认位置是相对于安装目录../sonatype-work/nexus3。安装目录下的bin目录下存放着nexus启动脚本以及启动相关的配置文件,etc目录下存放配置文件。数据目录下对我们比较有用的是etc目录,此目录包含 repository manager的主要运行时配置和定制( 如果需要修改默认端口,是修改该目录下的nexus.properties配置文件中的application-port属性 )。
3、启动服务可以分为两种,一种是通过shell的方式启动,进入安装目录下的bin目录执行命令nexus.exe /run启动服务,
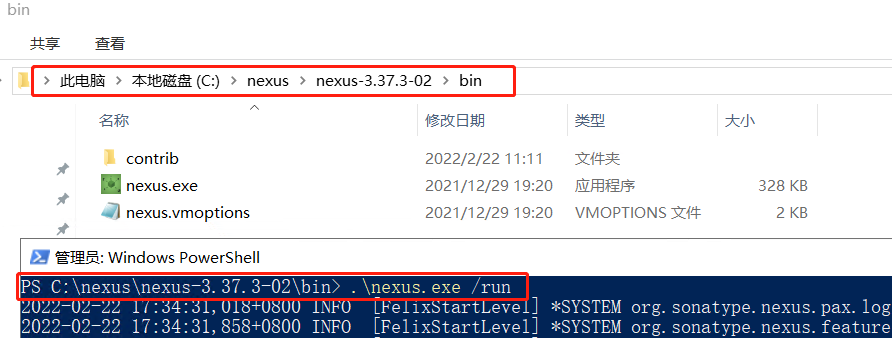
查看到Started Sonatype Nexus OSS 版本号,说明启动成功,结束shell窗口即停止服务。

第二种方式是 将nexus作为服务启动,也是推荐使用方式,以管理员身份运行shell,进入安装目录下的bin目录下执行命令nexus.exe /install安装成windows服务。安装完成后可以通过nexus.exe /start启动服务。
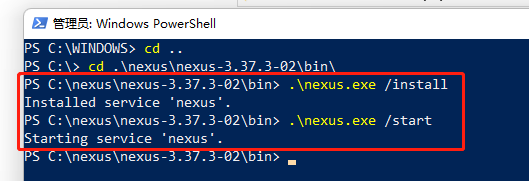
停止服务命令nexus.exe /stop,卸载服务命令nexus.exe /uninstall,查看状态nexus.exe /status,重启服务nexus.exe /restart。
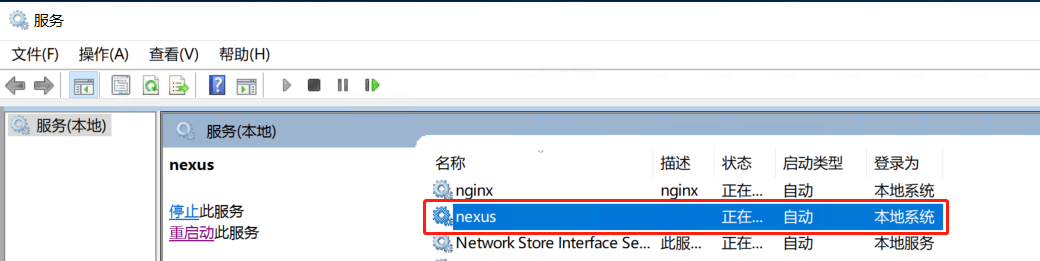
也可以通过windows服务管理中启动关闭服务。
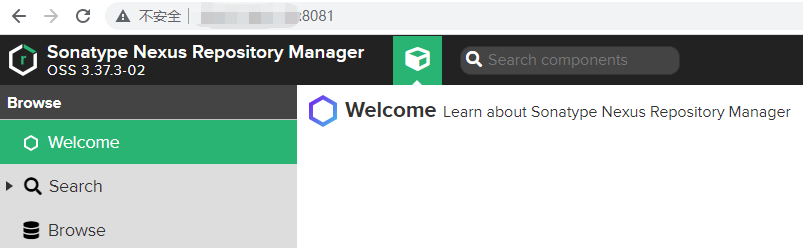
4、浏览器输入 http://server_host:port 进行访问,例如http://localhost:8081 ,访问后如下图
Nexus Repository OSS配置
首次登录
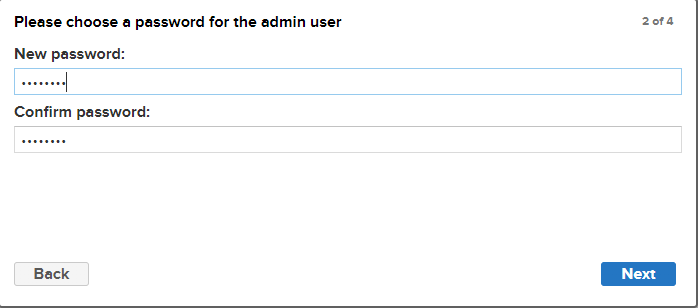
首次登录时,用户名为amdin,密码是在数据目录下的admin.password文件中。

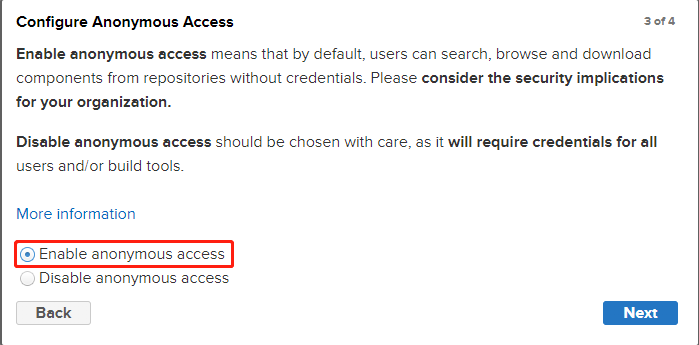
登录成功后,进行密码重置和允许匿名用户访问配置。
仓库介绍
默认情况下,Nexus Repository已经为我们创建好了几个仓库,没有特殊需求的话,直接使用即可。
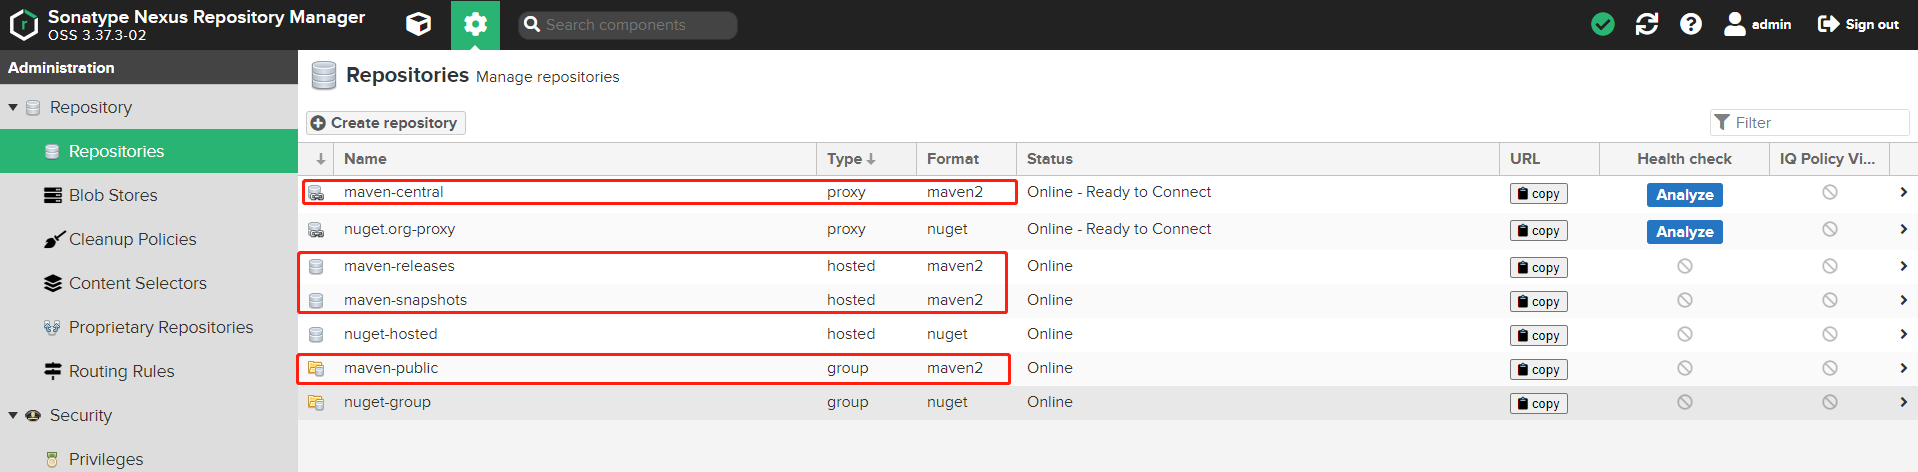
类型分为三种,proxy、hosts、group,具体解释如下:
- proxy:代理仓库,远程仓库的代理仓库。对组件的任何请求都会根据代理仓库的本地进行查找。如果没有找到本地组件,请求将转发到远程仓库。然后缓存到本地。之后,对同一组件的后续请求将从本地存储中完成,消除了再次从远程仓库检索组件的网络带宽和时间开销。这里默认带的maven-central仓库,就是对maven中央仓库的代理。
- hosts:用于存放公司内部项目的jar包等,供内部人员下载。还可以存放一些从maven中央仓库无法下载的jar包(比如Oracle JDBC驱动程序)。自带的maven-releases用于存放正式版本,maven-snapshots用于存放快照版本。
- group:组仓库,允许我们在单个仓库中组合多个仓库和其他仓库组。这意味着我们可以依赖单个URL来满足配置需求。自带的maven-public中就组合了maven-central、maven-releases和maven-snapshots,能够满足我们最基本的需要。
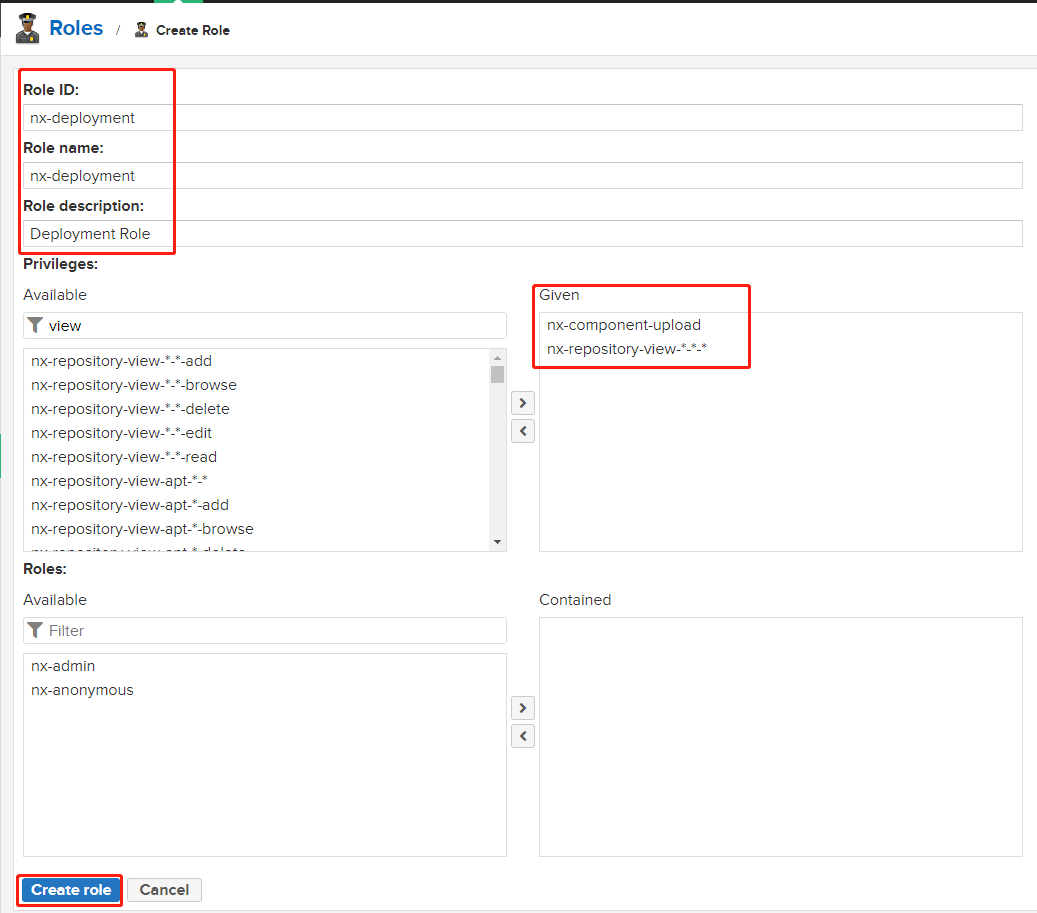
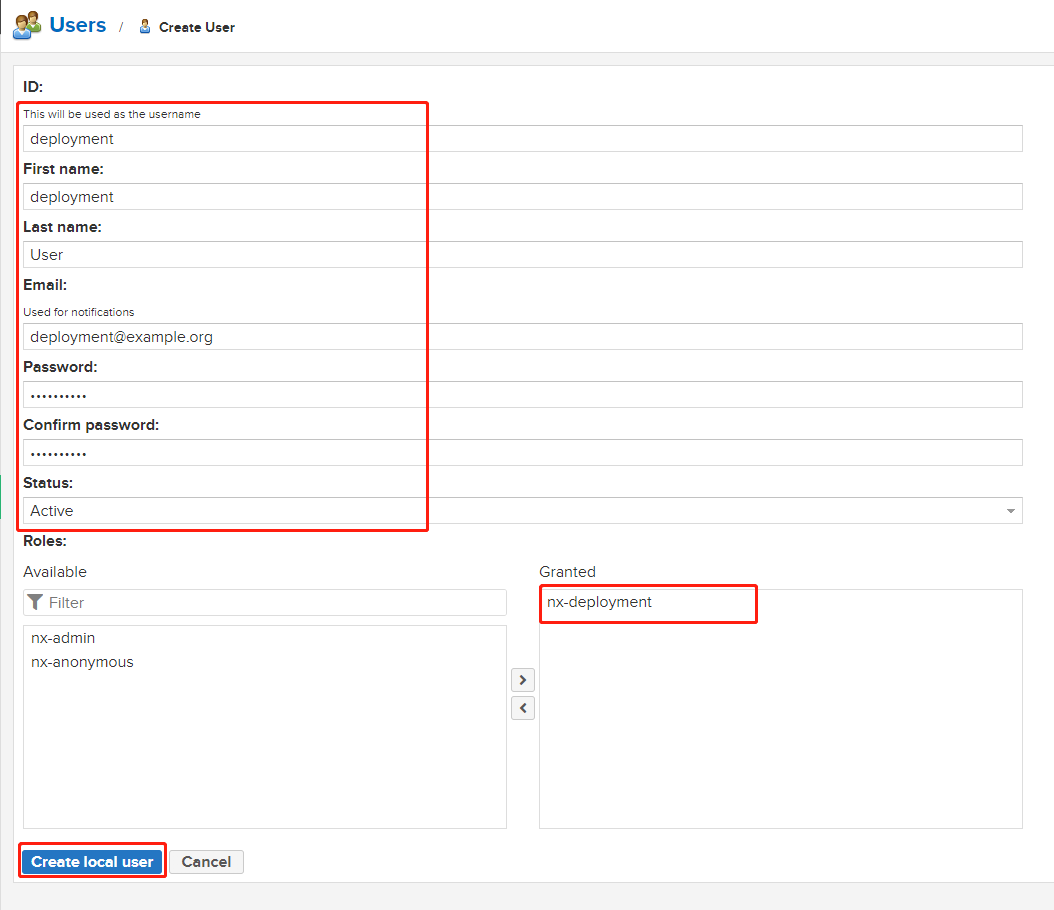
开发角色与用户配置
Nexus Repository默认给我们创建了两个角色和两个用户,分别是管理员和匿名用户,我们需要一个开发人员可以使用的用户与角色,能够可以通过IDE将jar包发布到仓库中。管理员账户权限过高不想暴漏,匿名用户又不够,需要我们自己进行创建。


新建开发角色:其中Role ID、Role name、Role description可以自己命名,我这里为了和自带角色风格一致,所以这样命名。
新建开发用户:角色选择上面创建的nx-deployment。
从私有仓库下载jar包
配置本地maven的settings.xml文件
1、在profiles标签下添加如下内容,这里的url使用的是组仓库的url,记得将server_host:port进行替换。
	<profile>
		<id>nexus</id>
		<repositories>
			<repository>
			<id>nexus</id>
			<name>Nexus Repository</name>
			<url>http://server_host:port/repository/maven-public/</url>
			<releases><enabled>true</enabled></releases>
			<snapshots><enabled>true</enabled></snapshots>
			</repository>
		</repositories>
	</profile>
2、激活上面配置的profile
  <activeProfiles>
	<activeProfile>nexus</activeProfile>
  </activeProfiles>
测试
1、新建一个项目,或在原有项目的pom中添加本机maven仓库没有的依赖:
        <dependency>
            <groupId>org.springframework</groupId>
            <artifactId>spring-core</artifactId>
            <version>1.0</version>
        </dependency>
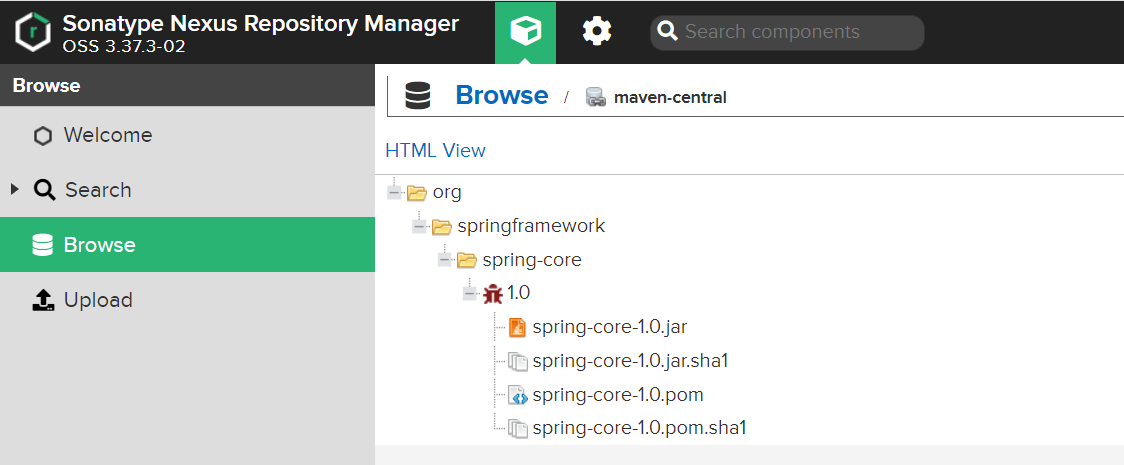
2、通过管理平台查看私有仓库,可以看到maven-central代理仓库已经将该jar包缓存到服务器本地
jar包上传到私有仓库
通过管理平台的upload上传
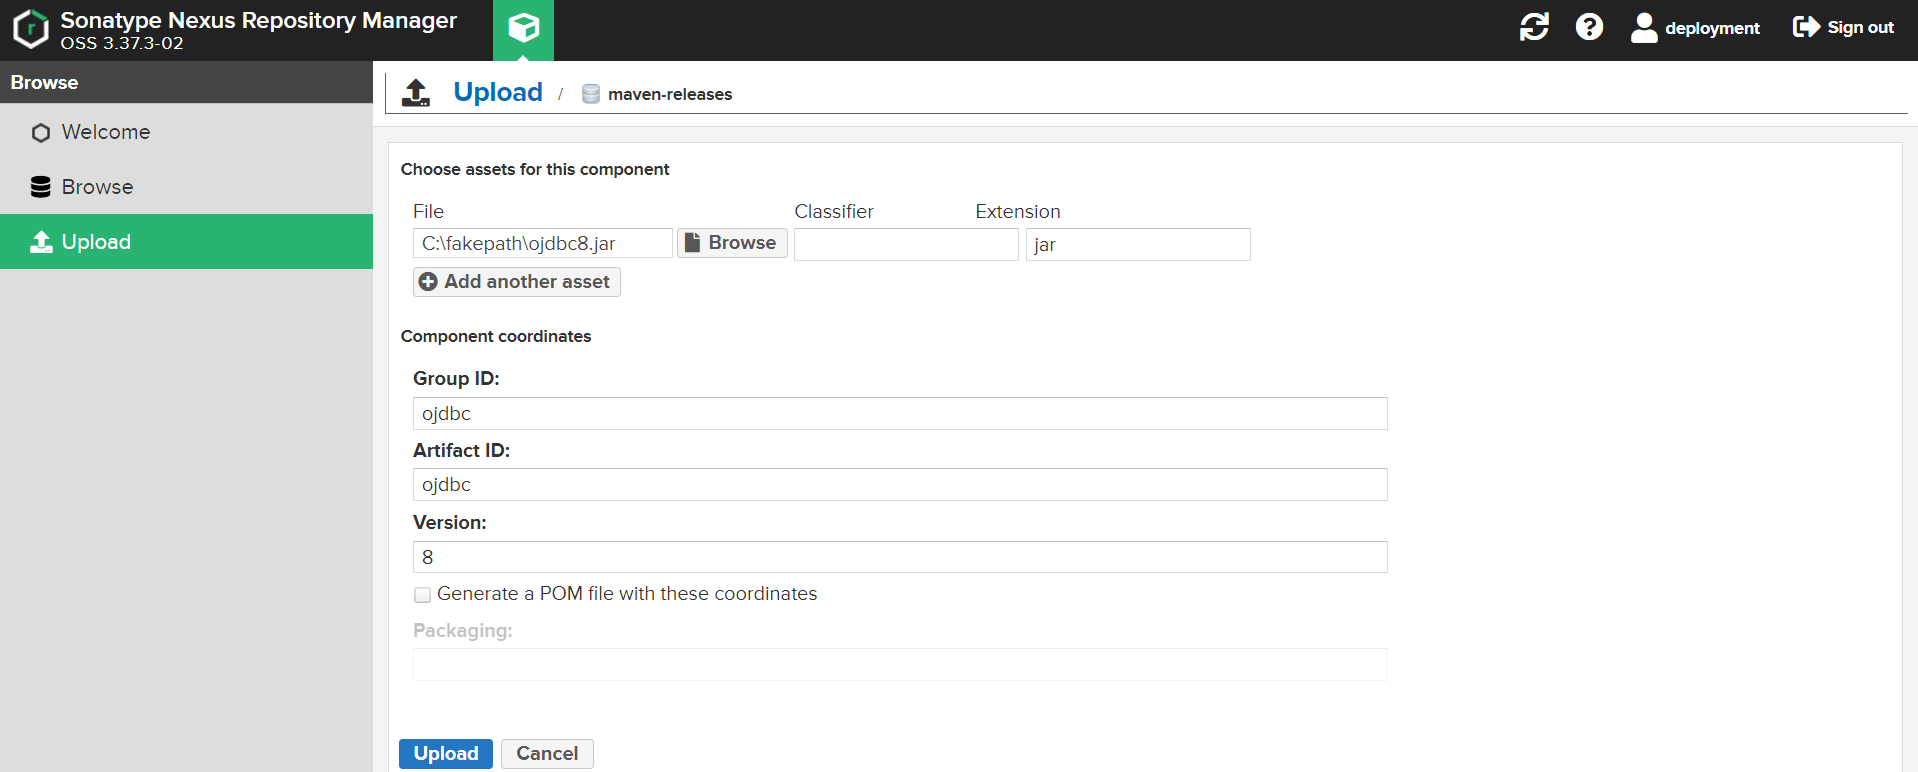
上传成功如下

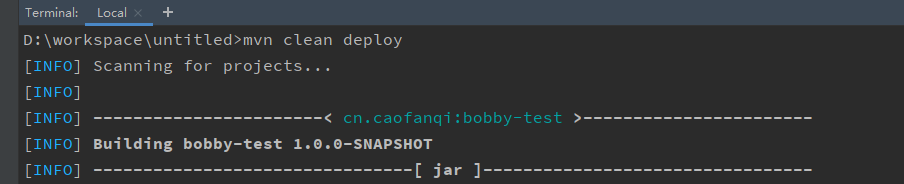
通过maven命令上传
1、修改本地maven的settings.xml文件,在servers标签下添加如下配置
    <server>
      <id>snapshots</id>
      <username>deployment</username>
      <password>deployment</password>
    </server>
	<server>
      <id>releases</id>
      <username>deployment</username>
      <password>deployment</password>
    </server>
2、在maven项目的pom文件中添加distributionManagement配置,记得将server_host:port进行替换。
<?xml version="1.0" encoding="UTF-8"?>
<project xmlns="http://maven.apache.org/POM/4.0.0"
         xmlns:xsi="http://www.w3.org/2001/XMLSchema-instance"
         xsi:schemaLocation="http://maven.apache.org/POM/4.0.0 http://maven.apache.org/xsd/maven-4.0.0.xsd">
    <modelVersion>4.0.0</modelVersion>

    <groupId>cn.caofanqi</groupId>
    <artifactId>bobby-test</artifactId>
    <version>1.0.0-SNAPSHOT</version>

    <!--  省略...  -->

    <distributionManagement>
        <repository>
            <id>releases</id>
            <name>Nexus Releases Repository</name>
            <url>http://server_host:port/repository/maven-releases/</url>
        </repository>
        <snapshotRepository>
            <id>snapshots</id>
            <name>Nexus Snapshot Repository</name>
            <url>http://server_host:port/repository/maven-snapshots/</url>
        </snapshotRepository>
    </distributionManagement>

    <!--  省略...  -->

    <build>
        <plugins>
            <plugin>
                <groupId>org.apache.maven.plugins</groupId>
                <artifactId>maven-compiler-plugin</artifactId>
                <version>3.8.1</version>
                <configuration>
                    <source>1.8</source>
                    <target>1.8</target>
                    <encoding>UTF-8</encoding>
                </configuration>
            </plugin>
            <plugin>
                <groupId>org.apache.maven.plugins</groupId>
                <artifactId>maven-source-plugin</artifactId>
                <version>3.2.0</version>
                <executions>
                    <execution>
                        <id>attach-sources</id>
                        <phase>package</phase>
                        <goals>
                            <goal>jar-no-fork</goal>
                        </goals>
                    </execution>
                </executions>
            </plugin>
        </plugins>
    </build>

</project>
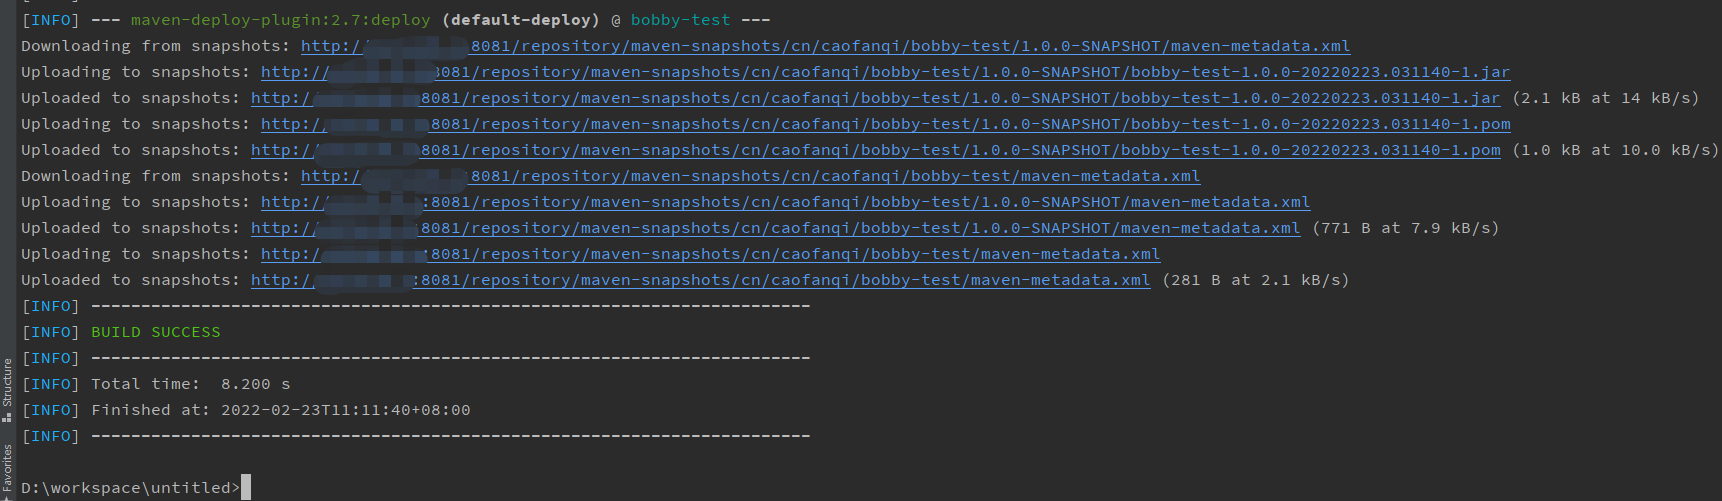
3、执行 mvn clean deploy 命令进行上传部署,我们的version后缀带有-SNAPSHOT的会部署上传到maven-snapshots仓库,同一版本号可以多次上传。
对于不带有-SNAPSHOT会部署到maven-releases仓库,同一版本号不能重复使用。
更多使用方式请查询官方文档:
https://help.sonatype.com/repomanager3